How We Fixed Up Our Old Barn and Turned it into a Wedding Barn
- terimandli
- Sep 26, 2022
- 7 min read
Updated: Jun 15, 2023

Back in 2020 our daughter announced she was getting married. We knew a traditional wedding ceremony at a hotel or convention center was not her style so my husband suggested why not have it in our barn! My first thought was, are you crazy! With less than 8 months there was no way we could get this accomplished! But, our daughter being the farm girl that she is, it only made sense to give her a “farm themed” wedding in a barn.
Getting our Barn Ready
Now our barn was not exactly anywhere near being ready for a wedding. At the moment, it wasn’t even suitable for animals! We don’t know all the history of the barn but it was approximately 100 years old. It was previously used as a dairy barn and then later for raising beef cattle and it also had a few horses on the property. It needed a new roof, but otherwise structurally was in excellent shape for its age. We saw the potential. Underneath all the junk and clutter it was quite beautiful. The craftsmanship that went into this old barn was quite remarkable! I can’t image what it would take to build something like it today!

So it was going to be a huge undertaking, but we were ready for the challenge. We started by removing everything out of the barn. Ben took a skid steer in the lower level to get the manure out. Then, we removed all the wood that was being stored there. We also had old insulation piled up, metal siding, wires, and garbage to name a few items that need to be removed from the barn.

The Grand Staircase
Once the cleaning was underway, we started by using up some of the old oak boards that we found and made a staircase leading to what was the hayloft. Now if we would have had to purchase the wood we used in this project it would have been ridiculously expensive and we would have had to find a cheaper way to do things. But luckily, we had a lot of wood to work with. Ben wanted to add a grand, 8 foot wide staircase in the center of the room. We also added a railing using some 2x6 oak boards

Once we added the staircase we now had access to the upper level which made things much easier. Before that there was only a narrow hay loft to get upstairs. We started by laying sub flooring over the damaged floor boards.

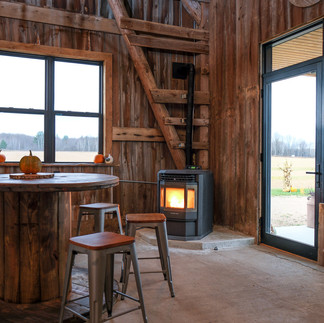
At this point it was winter of 2020 and things were coming along nicely. Her wedding was only 6 months away, but the farther along we got with this project the less intimidating it was becoming. Once the subfloor in the upper level was in place, Ben started adding wiring so we could install 3 chandeliers plus he added around 8 outlets. He also added the wiring for speakers so we could have surround sound. To cover up the electrical wiring we put metal over the lower half.

Adding the Chandeliers
It was a dark, cold winter day when we decided to install the chandeliers. Luckily for us, the winter of 2020 in North Central Wisconsin wan’t quite as cold as it normally is, which enabled us to get quite a bit of work done, but it was still cold! We borrowed scaffolding from my cousin and had my teenage son and a couple of his friends install the chandeliers. It wasn’t an easy job but they got it done! Once those lights were in, we could start to envision the wedding and dancing that would take place in our barn!

2020
Like many of us, March of 2020 is one that we’ll always remember. When everyone’s lives got turned upside down thanks to Covid. One blessing was since everything was canceled and Ben was laid off every other week, it enabled us to have more time to work on the barn. For this, I don’t think we would have gotten as far was we did.
The Windows
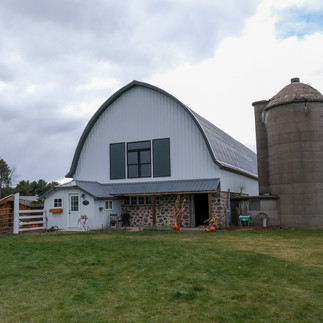
Our next step was to cut out the openings for the windows. Ben worked at a window company and was able to buy some awesome windows at a great price. The easy part was cutting out the opening for the windows. The hard part, however, was installing them! We borrowed a telehandler from my father who owns a dairy farm just a couple miles down the road. It wasn’t an easy job but once we got those windows in it was a game changer. The view from the barn was absolutely breathtaking and the barn was starting to look differently from the outside as well. I’m sure at this point the neighbors were starting to wonder what we were doing!

OK, Sometimes My Husbands Right
Now the next step in fixing up the barn was definitely my least favorite. Ben and I didn’t exactly agree on the exterior of the barn. I thought we should keep the look of the old wood siding on the exterior of the barn and save money and time by just leaving it alone and adding a fresh coat of paint. Ben wanted to insulate it and add metal siding. To me that sounded like a lot more work and expensive. I eventually gave in and realized he was right. Haha, I’ll admit sometimes he’s right! He wanted to better preserve the barn by covering the wood with metal. Some of the boards were already showing rot and if we didn’t do something soon the barn would start falling apart. With all the time and money we had already put into this place, it only made sense to spend a little more, put metal on it, and we would get many, many, more years out of this place. Now to insulate it was a pain. Again we had to borrow my dad’s telehandler and we put plywood on the outside of the barn on both ends, followed by 1 inch foam boards. Over top of the foam, we put furring strips so that we would have a place to attach the metal siding.

Back to the Interior
Now back to the interior of the barn. We now had a fairly empty barn with the upper level having lights, outlets and plywood over the floor. Next we installed the wood flooring. We found on Facebook Marketplace that Woodstock Flooring out of Birnamwood, WI was selling some utility grade hickory flooring. We decided the price was affordable and love the look of hickory so we purchased it. To save money we decided to install it ourselves. We started to install the flooring and my 18 year old son and his friend finished nailing it in place. Then I and Ben rented a sander to finish it. This took most of the day to sand smooth and since it was utility grade the boards weren’t perfect. We had to fill several of the holes and cracks with black epoxy. Once the sanding was done we decided to stain the floor. I believe the stain we used was “walnut.” By this time it was late in the evening and we were both exhausted. Once we were done, we both thought, “oh my goodness what have we done! We just covered up these beautiful hickory wood floors with this dark almost black looking stain.” It turned out way to dark for our liking and we lost all the colorful variations in the wood. We decided to sleep on it and hoped that in the morning the stain would dry lighter and it would look better.
The Whiskey Barrel Floors
Well, Ben could not sleep that night and got up around 2am the next morning and started sanding off the stain the best he could. As he sanded for several hours he started to really like the two tones, the dark and lighter look that was left on the wood. It was starting to seem like we purposely made it to look that way! The end result looked beautiful and we both loved it! It reminded us of the colors of an old whiskey barrel. It was perfect and we then added a water based sealer to the wood. After several coats and sanding between coats we were done. Wow we loved the floors! All the hours of work to finish them was so worth it!

We then put our attention back to the lower level of the barn and had my daughter’s husband to be and a few of his friends do the concrete work for the lower half of the barn. They also put the metal siding on the exterior of the barn. We decided to go with white since the windows had black trim. We thought white would look perfect and give the barn that “farmhouse” look.
We hired out for the roof of the barn. That was way beyond our building skills and decided to leave that to the experts!

One Month To Go
Now with just a little over a month to go, we felt that if the wedding was tomorrow we could pull it off. It wasn’t perfect but done enough that we could still give our daughter a beautiful farm themed wedding reception. However, since there was still time Ben decided to build a rustic western themed bar. He used more of the wood that we had lying around plus some of the old barn boards that had to be removed from the openings that were cut out for doors and windows. The bar top was made from old oak boards found on the property. We planed them down and glued, sanded and screwed them together. We found some old metal stools and decorations from various barn sales. Ben also decided to put in a porch on the entrance of the barn. We found a cute gray swing and made some black and white pillows to match.

The day before the wedding we were still staining and putting poly on some of the wood but for the most part it was done! We couldn’t believe that in a matter of 8 months we went from a dirty old barn to an absolutely gorgeous place for a wedding. By this time we were quite exhausted but so happy to be done and able to give our daughter a beautiful wedding. We were very fortunate to have many of our family members, son-in-law and his co-workers and friends that helped with this project. We couldn’t have done it without them!
This is how Pike Lake Farms Wedding and Event Barn got its start. After all that hard work, we are now ready to host weddings in our barn!